One of first features I notice when I look at someone’s face is their eyebrows. They frame the face and give visual structure to balance everything else. Throughout history and across cultures, eyebrows are incorporated into various idioms that represent one’s beauty or mood. They can really make a difference!
Here are some ideas to make sure your brows not only complement but enhance your face.
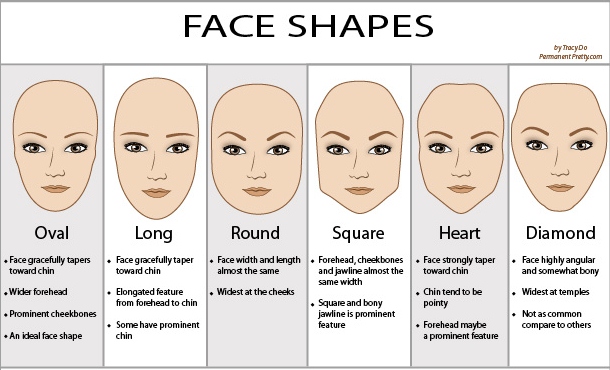
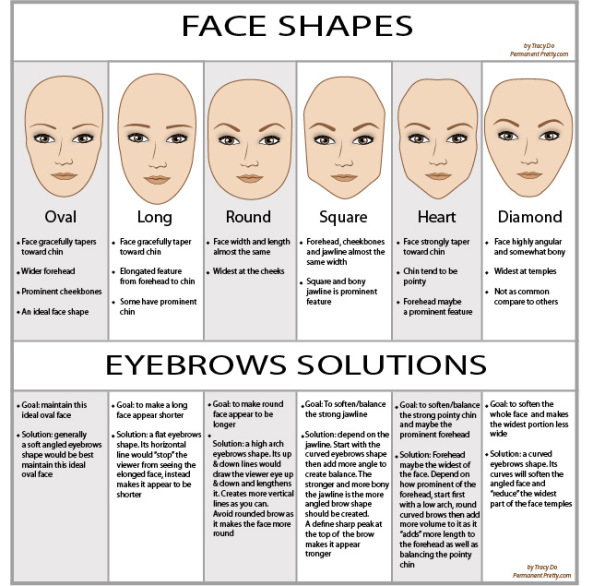
1. Know Your Face Shape
Again, we start from the beginning. “Know thyself.” There are many ways to figure out your face shape, but one of the easiest is to look in the mirror, use a dry-erase marker or a lipstick (!) to trace the outline of your face. Match it with one of the shapes in the diagram below.
2. Choose a brow shape
Once you know your face shape, now you want to figure out your goals. Do you want to look a certain way? More youthful or more sophisticated? More feminine or more androgynous? The angles and thickness of your brows can help alter the impression you give. And as always, since it’s makeup, you can always change your eyebrow shape to whatever you want depending on your mood or outfit; that’s the beauty of it all!
Here are classic solutions that complement your face shape:
In general, straighter, fuller brows are more youthful and boyish, while thinner and more arched or angular brows tend to be considered more “sophisticated” and feminine. Eastern and western perspectives of beauty also contribute to your personal aesthetic ideals. For example, growing up in the US in the 90 and 2000s, I always saw thinner, more angular and precise eyebrows (a la Gwen Stefani, Angelina Jolie, etc.), but while living in Hong Kong in the 2010s, the Korean straight brow was all the rage. (It is slowly balancing back to a more natural brow now.) When I visited beauty professionals, all they would want to do was to straighten my eyebrows and make them super thick. I pushed back, not to be contrarian, but knowing full well that my round face did not suit a straight brow; I was disappointed that the “professionals” I encountered were a product of trends and could not see past this particular fad to provide their clients with timelessly beautiful eyebrows that would suit their faces. Unless I get my jaw shaved down with plastic surgery to achieve that highly desired V-shape, I will have to work with the round face I’ve got.
Here are examples of the Western vs. Asian brows:


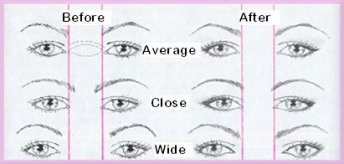
2A. Measure Your Eye Shape
Use a thin pen/pencil/tool (I like using a rat-tail comb to do this precision work) to measure and an eyebrow pencil or an eyeliner to mark your these points on your eye:
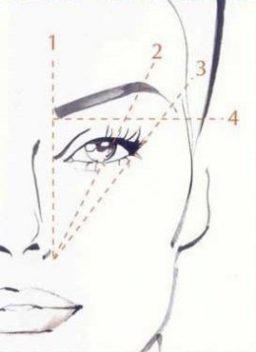
1: Starting from the outside of your nostril to the inner corner of the eye to your brow area, that end point is where your brow should begin.
2: From the outside of your nostril to the outer ring of your iris to your brow is where your arch should be.
3: From the outside of your nostril to the outside corner of the eye is where the end of your brow should be.
4: Generally both of your brows should be similar in height in terms of the start point and end point. However, keep in mind that if you brow grows downwards after the arch, around your eye, then it will close off your eye, so you might want to keep it wider/more open. It might just be safer to make sure the end of the brow ends higher than the front of the brow.
2B. The Space Between
The distance between the start of your brows will determine the perceived width of your nose. In other words, the closer together your brows are, the narrower your nose will look and the farther apart your brows are, the wider your nose will look. Also, consider the space between your eyes. If you have close-set eyes, you will want to start your brows right above the start of the inner corners of your eyes as far as possible; if you have wide-set eyes, start your brows a little bit closer together. While these guidelines for optical illusions are helpful, take them in stride, and make sure that it is still a reasonable distance from the start of your eye, keeping in mind the measurements shown above.
3. Sketch Your Shape
This step is crucial. Whether you are doing it yourself at home or approaching a professional to alter the shape of your brows, make sure you are happy with the look before one strand is touched. One way to do this is to first pencil in the brows and then use a light eyeshadow or a white eyeliner pencil to isolate the unwanted hairs.
4. Remove Unwanted Hair
Most people will pluck/tweeze because it’s the most accessible and easiest method they know. There are other options, such as waxing, threading, and even razoring. Choose one you are most comfortable with. Tweezing, waxing, and threading will remove the hairs from the base of the follicle, which will cause them to grow out thinner and sparser, or even stop growth completely. It’s true that once you overpluck, it might be hard to regrow those hairs in that area, so proceed with caution. Using a blade, on the other hand, will not cause this problem, but it might require more frequent touch ups as the stubble will grow back according to your regular hair growth. Those who are doing it for the first time or are unsure, it might be worthwhile to find a professional to shape your brows first and then pluck/razor them for personal maintenance.
If you are removing the hairs from the root, consider putting a warm-hot towel on your face for a little while to open up the pores so it decreases the pain. Afterward, use a cool towel to close up the pores and bring down the redness and swelling.
It it equally important to remember to trim the eyebrow hairs with scissors. Use an eyebrow brush or spooly to brush hairs straight up or down, and any hairs that extend beyond your brow line should be trimmed. Hairs at the tail end should only be trimmed slightly so as to keep the shape and length of the brow.
5. Fill Them In
Unless you are blessed with amazingly full brows (which probably meant that you had to do a lot of work in the previous few steps), most people will still need to fill in some sparse areas where their brows hairs don’t naturally grow in order to achieve that ideal shape. Here are some products on the market that are helpful:
- Brow Pencils – their waxy consistency is used to thicken existing hairs. If used to “draw on” nonexistent hairs, it can look less than realistic.
- Brow Pomade – these are great for darkening the brows and even imitating brow hairs when used sparingly. Some are even waterproof so they last longer.
- Brow Powders – any matte eyeshadow will do. If you have dark hair, choose a brown color that is 1-2 shades lighter. If you have light colored hair, choose a brown that is 1-2 shades darker. Unless you have red in your hair, stick to ashy tones. Use these powders to create hairs where you had none for the most natural effect.
- Brow Pens – these liquid brow liners are great for a longer-lasting and dimensional effect, especially for precision at the tail of the brow, but be lighthanded at the front of the brow so they don’t look too blocky.
- Brow Gels – these come in various tint shades or clear and can simultaneously thicken and hold brows in place. Also, if you find the gels too glossy or sticky, try the old trick of spraying hairspray on a spooly brush and running them through your brows to tame flyaways.
As a general rule, you want to use these products with a light hand in short strokes to mimic your natural brow hair growth. For beginners, it is helpful to have a few q-tips/cotton buds on hand to clean up any mistakes and a spooly brush to blend in colors so it looks natural. Take your time and step back often to check the overall effect. The front of your brows should be lighter than the ends. For those who already have good brows and want a quick fix, a tinted brow gel might be all you need. For the rest of us, we will need varying combinations of aforementioned products. Play around and see what works best for you!
Male Grooming: A Word to the Gentlemen
I put this as a separate section not because I want to alienate you, but just because I know mostly women will be reading this, but I also want to address you as well. (Women, if you would like to direct your male partners to this post, please do! Good grooming is good for everyone.)
It doesn’t hurt to clean your eyebrows every now and then, especially for a special event like a wedding, birthday, or anniversary. It’s the smallest thing that can make the biggest difference and leave people wondering what it was that made you look that one bit more polished.
For men, the general goal is to appear well-groomed and clean, not necessarily fancy or too overdone. I personally think it’s better to leave a few stray hairs than to accidentally over-pluck, because society generally appreciates men who don’t look like they’ve tried too hard to work on their appearance.

Good luck on your brow journey!! If this guide was helpful to you, please leave me some love in the comments section!

awesome blog
LikeLike